Second Screen Player
Version 1.1.3
User Manual
Second Screen Player (SSP) is a professional video and image playback system built for live events, conferences, and houses of worship. It sends your media to a second screen (projector, LED wall, or external monitor) with smooth transitions, per-item color correction, and audio mixing — all controlled from a single operator interface.
Run SecondScreenPlayer-Setup.exe and follow the installer prompts. The application installs to your chosen directory and creates a Start Menu shortcut.
On first launch, SSP shows a license activation dialog. Enter your license key in the format XXXX-XXXX-XXXX-XXXX and click Activate. The key is validated against the CueCongress server and linked to your device.
cuecongress.com.A 7-day free trial is available. Create a CueCongress account at cuecongress.com, start the trial from the Pricing page, then enter the trial key in SSP.
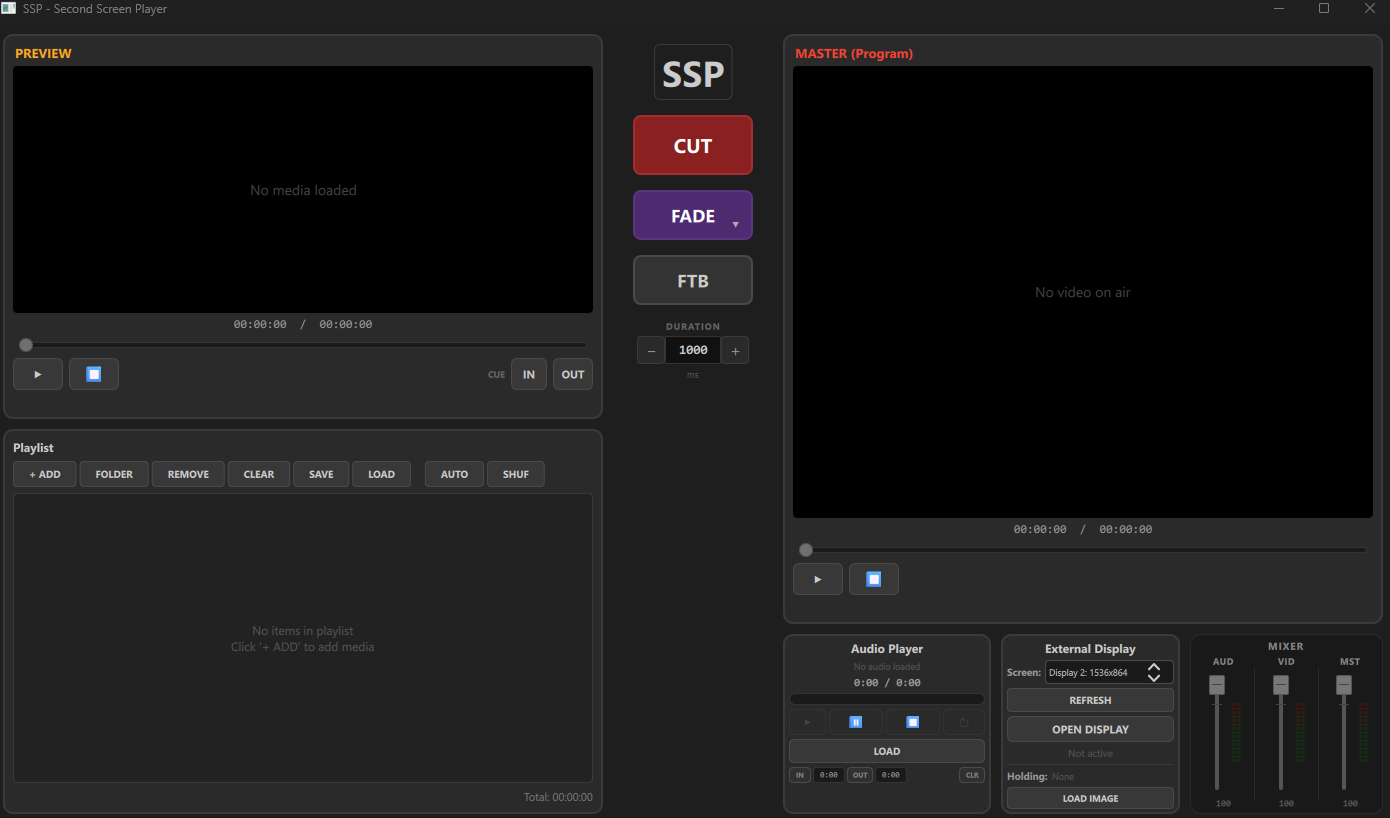
The interface is divided into three main columns:
| Column | Contents |
|---|---|
| Left — Preview & Playlist | Preview monitor (top) shows the next item before sending it to output. Playlist panel (bottom) manages all your media items. |
| Center — Transition Controls | SSP logo (click for About dialog), CUT button, transition button (FADE) with dropdown arrow, FTB (Fade to Black), and transition duration control. |
| Right — Master (Program) | Program monitor shows what is live on the output screen. Below: Audio Player, External Display settings, and Audio Mixer panels. |
The UI scales responsively with window size — all panels resize proportionally.
The Preview monitor (top-left, orange label) shows the item that is ready to go live. When you select an item from the playlist, it loads here first so you can verify it before sending it to the output.
| Control | Description |
|---|---|
| Play / Stop | Play or stop the preview video to check content before going live. |
| Seek Bar | Scrub through the video timeline. Seeking while paused stays paused. |
| IN / OUT | Set In and Out points to define a custom playback range. The video starts at the IN point and stops (or loops back) at the OUT point. |
| 📷 Snapshot | Capture the current video frame as a PNG and save it to your Pictures folder. The filename includes a timestamp (e.g. snapshot_20260422_143021.png). Shows "Saved!" in green on success. |
The Program monitor (top-right, red label) shows what is currently live on the output display. This is an exact mirror of what your audience sees on the projector or external screen.
Below the monitor you will find play/stop controls and a seek bar for the live video. A countdown timer shows remaining time with color-coded warnings:
A small badge displays the video resolution and FPS of the current program item.
The 📷 Snapshot button captures the current live frame as a PNG and saves it to your Pictures folder with a timestamp filename.
The center column controls how content moves from Preview to Program (live output).
Instant switch. The preview content immediately replaces the program content with no animation.
Click the main button area to execute the currently selected transition. The button label shows which transition is active. Click the small arrow in the bottom-right corner to open the transition picker dropdown.
| Transition | Description |
|---|---|
| Cut | Instant switch (no animation). |
| Crossfade | Smooth opacity blend between outgoing and incoming content. |
| Wipe L/R/U/D | Incoming content slides over the outgoing content from the specified direction. |
| Push L/R/U/D | Both layers move together — outgoing is pushed off as incoming enters. |
| Zoom In | Incoming content starts small and scales up to full size. |
| Zoom Out | Incoming content starts large and scales down to full size. |
Fades the entire output to black. Press again to fade back in. Useful for breaks or pausing the show.
Controls how long transitions take in milliseconds. Use the - and + buttons to adjust in 100ms steps. Default is 1000ms (1 second). Range: 100ms – 5000ms.
The Playlist panel (bottom-left) manages all your media items. Each row shows a video thumbnail, filename (or custom name), duration, and control buttons.
SSP supports 8 independent playlist tabs, displayed as a row of buttons at the top of the Playlist panel. Each tab contains its own set of items, completely separate from the others.
| Action | Description |
|---|---|
| Click a tab | Switch to that playlist. The list updates instantly. Program playback is never interrupted. |
| Double-click a tab | Rename the tab. Type a new name and press Enter to confirm, or Escape to cancel. |
| Save / Load | All 8 tabs (names and contents) are saved and loaded together in a single .ssp project file. |
| Button | Description |
|---|---|
| + ADD | Add a single media file (video, image, or audio) to the playlist. |
| FOLDER | Add all media files from a folder at once. |
| REMOVE | Remove the selected item from the playlist. |
| CLEAR | Remove all items from the playlist. |
| SAVE | Save all 8 playlist tabs to a single .ssp project file. All tab names, items, and settings are preserved. |
| LOAD | Load a previously saved .ssp project file. All tabs are restored exactly as saved. |
| AUTO | Enable auto-advance. When the current item ends, the next item is taken automatically with a cut transition. |
| SHUF | Shuffle the playlist order randomly. Each item plays exactly once before repeating (with loop) or stopping (without loop). |
| LOOP | Toggle playlist looping (visible when AUTO is active). When off, the playlist plays once then stops, revealing the holding image if one is loaded. |
| SCROLL | Enable Cylinder Scroll mode on the program output. Content scrolls horizontally in a continuous loop, designed for 360° LED walls. Toggle direction (Left/Right) and adjust speed with the stepper control. |
When AUTO is enabled, images hold on screen for a configurable duration before advancing. Use the - and + stepper (visible when AUTO is active) to set the hold time from 1 to 120 seconds.
| Button | Description |
|---|---|
| LOOP | Toggle looping for this item. Video loops between IN and OUT points. |
| AUD | Toggle audio for this item. When disabled, the video plays silently. |
| Edit (pencil icon) | Open the Edit Item popup to adjust zoom, brightness, contrast, saturation, temperature, and volume. |
Items can be reordered by dragging the drag handle on the left side of each row. The preview and program indices are automatically updated.
The footer of the playlist shows the combined total duration of all items in HH:MM:SS format.
Click the pencil icon on any playlist item to open the Edit Item popup. This lets you fine-tune visual and audio properties per item. Changes are applied when the item goes live on the program output.
| Property | Range | Description |
|---|---|---|
| Zoom | 10% – 300% | Uniform scale of the content. Useful for cropping or emphasizing part of the frame. |
| Zoom W | 10% – 300% | Independent horizontal (width) zoom. Stretch or compress the image horizontally without affecting height. |
| Zoom H | 10% – 300% | Independent vertical (height) zoom. Stretch or compress the image vertically without affecting width. |
| Brightness | -1.0 to +1.0 | Adjust overall brightness of the item. |
| Contrast | -1.0 to +1.0 | Adjust contrast. Positive values increase contrast. |
| Saturation | -1.0 to +1.0 | Adjust color saturation. Negative desaturates toward grayscale. |
| Temperature | -1.0 to +1.0 | Adjust color temperature. Positive values shift warm (orange), negative values shift cool (blue). |
| Volume Trim | 0% – 100% | Adjust the volume level for this specific item. Useful for normalizing volume across different media files. |
| Speed | 0.25x – 2.0x | Playback rate for video items. 1.0x is normal speed. Values below 1.0x slow down, above 1.0x speed up. Saved with the playlist. |
The thumbnail preview in the popup shows the effect of your adjustments in real time as you move the sliders.
The item name field at the top of the popup is editable. Click it to type a custom display name for the item.
Click the RESET button to restore all properties (zoom, zoom W/H, brightness, contrast, saturation, temperature, volume, speed) to their default values.
A standalone audio player for background music or audio tracks, independent from the video playlist.
| Control | Description |
|---|---|
| LOAD | Open a file dialog to load an audio file. |
| Play / Pause / Stop | Standard transport controls for the audio track. |
| Loop | Toggle continuous playback of the loaded audio file. |
| Seek Bar | Scrub through the audio timeline. |
| IN | Set a cue-in point at the current position. Audio playback starts from this point. |
| OUT | Set a cue-out point at the current position. Audio loops back to IN when reaching OUT. |
| CLR | Clear both IN and OUT cue points. |
Visual markers on the progress bar show the IN and OUT positions.
Configure which screen is used for the output display.
| Control | Description |
|---|---|
| Screen dropdown | Select the target screen from a list of connected displays (shows resolution). |
| REFRESH | Re-detect connected displays. Use after plugging in a new screen. |
| OPEN DISPLAY | Activate the output window on the selected screen. Goes fullscreen automatically when a second screen is detected. |
Upload a logo or branding image that displays on the output screen whenever no video or image is playing. Ideal for conferences and live events where you want your brand visible between content.
| Control | Description |
|---|---|
| LOAD IMAGE | Open a file dialog to select a holding image (PNG, JPG, JPEG, BMP, WEBP). |
| CLEAR | Remove the current holding image. Only visible when an image is loaded. |
The holding image is automatically saved and restored with your playlist (.ssp) file. It uses aspect-fit scaling to display correctly on any screen resolution. When Fade to Black (FTB) is active, the holding image fades to black along with all other content.
F11 to toggle fullscreen on the output window, or Escape to exit fullscreen.A broadcast-style 3-channel mixer with vertical faders and stereo VU meters.
| Fader | Description |
|---|---|
| AUD | Audio player volume. Controls the level of the standalone audio player. |
| VID | Video (program) audio volume. Controls the audio level of the live video. |
| MST | Master output volume. Controls the overall audio level of both AUD and VID channels combined. |
Each channel has a 15-segment LED-style stereo VU meter (L and R) with real PCM-based level analysis:
The MST channel shows combined metering of AUD + VID scaled by the master fader level. Metering is post-fader, reflecting the actual output level.
Click the SSP logo in the center column to open the About dialog. It shows:
Click the Check for Updates button in the About dialog to check for a newer version. If an update is available, a link opens to the download page. SSP also checks for updates automatically 3 seconds after startup.
To move your license to a different device, click Deactivate License in the About dialog. This frees the device slot so the key can be activated elsewhere.
All keyboard shortcuts in SSP are fully configurable. Click the ⌨ SHORTCUTS button at the bottom of the Transition Column to open the Shortcuts panel. Click any key badge to assign a new key, press Escape to cancel, or click × to clear a shortcut. Press Reset Defaults to restore all defaults. Shortcuts are saved automatically and persist across sessions.
| Default Key | Action |
|---|---|
| Space | Take — CUT (instant cut to program). |
| Enter | Take — FADE (execute the selected fade transition). |
| B | Fade to Black — toggle FTB. |
| F11 | Toggle output window fullscreen. |
| 1 – 9 | Load playlist item 1–9 into Preview. |
| Ctrl+O | Open a media file. |
| Ctrl+S | Save project. |
| Ctrl+Shift+O | Load project. |
| Escape | Exit output fullscreen (always active, not reassignable). |
Additional actions available to assign (no default key): Preview/Program transport controls, Cue GO, Next/Previous Item, Snapshot, Autoplay, Loop, Shuffle, Cylinder Scroll, and STILL.
The Cue Panel is located in the Transition Column, above the ⌨ SHORTCUTS button. It provides a compact live-operation view for working through a playlist cue by cue.
| Element | Description |
|---|---|
| Position badge | Shows the current preview slot and total items, e.g. 3 / 8. |
| Blue name bar | Displays the filename of the item currently loaded in Preview. |
| Grey next-up bar | Shows the filename of the item that will load into Preview after GO is pressed. |
| ◄ PREV | Load the previous playlist item into Preview (wraps to last item). |
| NEXT ► | Load the next playlist item into Preview (wraps to first item). |
| GO | Execute the active transition (same type as the FADE button selection), then automatically advance Preview to the next item so you are always one cue ahead. |
| Type | Formats |
|---|---|
| Video | MP4, MKV, AVI, WebM, MOV, WMV, FLV, M4V, MPG, MPEG, TS |
| Image | PNG, JPG, JPEG, GIF, BMP, SVG, WebP |
| Audio | MP3, WAV, FLAC, OGG, M4A, AAC, WMA |
| Playlist | .ssp (SSP native format) |
| Requirement | Specification |
|---|---|
| OS | Windows 10 or later (64-bit) |
| RAM | 4 GB minimum |
| Disk | 414 MB free space |
| Display | 1280 x 720 minimum (second display recommended) |
| GPU | Hardware-accelerated video decoding recommended |